BOOK THIS SPACE FOR AD
ARTICLE ADWith the introduction of the Raspberry Pi 4 series, with more than 1GB of memory, it has become much more practical to install and run Linux distributions other than the standard Raspberry Pi OS (formerly known as Raspbian). So it's time for me to give Ubuntu a try again, and see how it goes.
The first part of this task is simply deciding what version of Ubuntu to install – and that is nowhere near as easy as it sounds. Those who are familiar with Ubuntu and the RPi will know that the Ubuntu Mate project has had a Raspberry Pi version for quite some time, while the "official" Ubuntu Raspberry Pi distribution has only come out recently, and is only available for the Raspberry Pi 4. I will be looking at both of these.
SEE: Hiring Kit: Python developer (TechRepublic Premium)
Even after deciding on the "official" version, there is still another (unnecessarily confusing) decision to make – the Ubuntu Raspberry Pi downloads page shows different download buttons for the Raspberry Pi 4 and Raspberry Pi 400, with no hint of what the difference might be. I was actually hopeful that the RPi 400 version included some sort of customizing for that platform. Unfortunately that does not seem to be the case; after downloading and comparing them (with Linux binary "cmp"), it seems they are identical - so why the heck bother to list them separately? (I know, why make things simple when you can make them complicated...)
The download is a 1.6GB xz-compressed installation image, which expands to 8.1GB, so you are going to have to use at least a 16GB SD card for the installation. To uncompress and copy the image to the SD card with one command line:
IMPORTANT NOTE: This command will overwrite the entire contents of the SD card. Any existing information on the card will be lost.
xzcat ubuntu-20.10-preinstalled-desktop-arm64+raspi.img.xz | dd bs=4M of=/dev/sdX iflag=fullblock oflag=direct status=progress
So, what is all of that mess? Briefly:
xzcat uncompresses the download file and writes it to standard output, so we can pipe it to the dd commanddd is the Linux raw copy utility, which will actually write the data to the SD cardbs=4M tells dd to read/write the data in blocks of 4 Megabytesof=/dev/sdX tells dd where to write the output; you need to replace the X with the device identifier for the SD card on your system; be very careful about this, because putting the wrong character here can have catastrophic consequencesiflag=fullblock tells dd to accumulate full blocks on the input before proceeding to the outputoflag=direct tells dd to use direct I/O operations for the datastatus=progress tells dd to show a periodic summary of the data transfer
This will result in the SD card having a 256MB fat32 partition containing the boot information, and a 7.9GB ext4 partition containing the Ubuntu desktop image. When you boot this SD card in a Raspberry Pi, the first thing it will do is expand that ext4 partition to fill the rest of the free space, so if you want to do something clever with the remaining space on the SD card, such as make another separate partition, this is the time to do it.
For purposes of this initial test, I put the SD card into a Raspberry Pi 4 with 4GB of memory. When I booted it I saw messages about the root filesystem being expanded, as expected, and then the standard Ubuntu 20.10 "Groovy Gorilla" wallpaper came up. It then started a System Configuration dialog which consisted of:
Language selectionKeyboard layoutWireless network selectionLocation/timezone selectionUser account creationThe system configuration process then ran for a few minutes, with a propaganda slide show running on the screen. When that was finally done, I was presented with the standard Ubuntu login screen.
Logging in then resulted in a very standard looking Ubuntu 20.10 desktop:
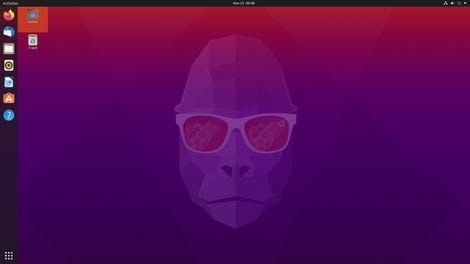
Ubuntu 20.10 on Raspberry Pi 4 (4GB).
Image: J.A. WatsonIt then ran through another setup sequence, consisting of:
Online Accounts: if you have "Ubuntu Single Sign-On", Google, Nextcloud or Microsoft (nope)Help improve Ubuntu: by allowing it to send data to Ubuntu (no thanks)Privacy: Enable/disable Location Services (disable, please)You're ready to go!
Performance up to this point seems quite reasonable. I should note that I am doing this with a standard 1920x1080 HDMI display, a cordless keyboard and mouse connected via a Logitech Unifying USB receiver, and a wired (RJ-15) network connection.
I then disconnected the wired network, and connected to my local WiFi network with no trouble. I ran speed checks on both wired and wired networks, with roughly the same results. So far this is looking like a very routine Ubuntu installation sequence, and the performance on the Raspberry Pi 4 still impresses me as being more or less the same as for any of the other systems around here.
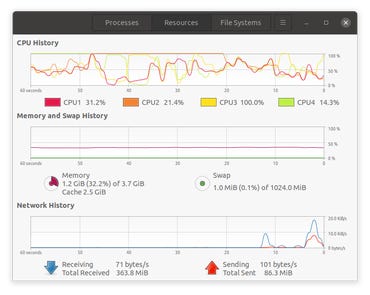
System Monitor during update.
Image: J.A. WatsonThe next step was to check for updates, which of course were found because it has been a month or so since Ubuntu 20.10 was released. Those downloaded and installed without problem as well; while that was running, I started the system monitor utility, shown here at the right. You can see the four ARM cores chugging along, and the system using about 1.2GB of memory. Once the updates were done, I was prompted to reboot the system, which I did.
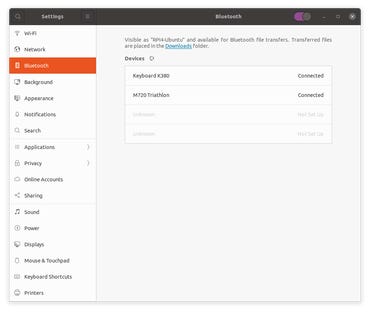
Bluetooth Devices.
Image: J.A. WatsonNext on my "be sure to check this" list is Bluetooth, because I have had a history of Bluetooth connection problems with Raspbian. I got out the Logitech M720 mouse and K380 keyboard, and connected both with absolutely no problem. Hooray! The paired status of both devices survives reboots and power cycles. Very nice.
To get a bit of a "real world" use/performance check, I switched from writing this post on my desktop system to the RPi4/Ubuntu system. I hadn't thought about the fact that Ubuntu has Firefox for the web browser, rather than the RPi-optimized Chromium which is included in the Raspberry Pi OS. That made me wonder if there might be a noticeable difference of performance in this area, but the initial good news is that my first impression is good, I don't see any of the lags, delays or other performance issues that have been obvious over the years on Raspbian. A quick side trip to YouTube showed that video playback is very good as well.
Finally, what about using two monitors? I shut down, connected a second 1920x1080 HDMI monitor, and booted back up.
 Image: J.A. Watson
As you can see, it came up with both monitors configured for an extended desktop. Good stuff.
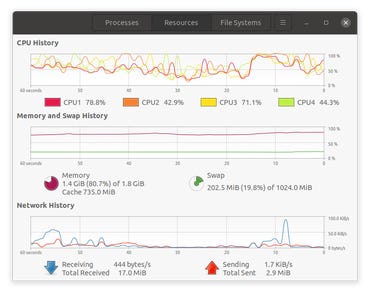 Image: J.A. Watson
With that all looking pretty good, the last thing I want to check with this distribution is how it runs with different amounts of memory. I first tried it with an 8GB RPi 4, and that worked just fine – no surprise. Then I tried it in a 2GB system; it booted and I was able to login with no problem, but when I started the system monitor, and then just ran Firefox it showed the memory use was uncomfortably close to 100%.
The Ubuntu Raspberry Pi Downloads page says that the Desktop version "only works" with 4GB or 8GB of RAM. I think that's a bit strongly worded, because it clearly does boot and run quite well on a 2GB system, but how usable that might actually be would depend on what applications you planned to use.
That's enough with "standard" Ubuntu on the Raspberry Pi for now. Next up is Ubuntu MATE.
The Ubuntu MATE download is smaller, 1.6GB for the download file and 6GB for the uncompressed image. The command to copy the image to an SD card is the same as given above (xzcat ... | dd ...).
The partition table that it creates on the SD card is similar to that above, but the Linux root partition has essentially no free space (the standard Ubuntu distribution had about 1GB of free space). So if you want to set up the partitions yourself, make sure that you add a reasonable amount of free space to the root before creating another partition.
On first boot it goes into the same system configuration dialog as described above, for the Language/Keyboard/Wi-Fi/Timezone/Account information. It again takes a couple of minutes to complete the configuration, and then continues with a login screen. It is worth noting that at this point although you have selected the keyboard configuration, it has not yet been applied so that when you have to type in anything during the configuration sequence, the keyboard will still have a US English layout. That is irritating when giving the account information, but it can be a serious problem if you are trying to type a Wi-Fi password.
Logging in got me to a pretty standard MATE desktop, with top and bottom panels.
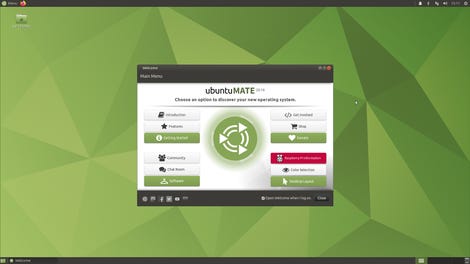
Ubuntu MATE 20.10 Desktop on Raspberry Pi 4.
Image: J.A. WatsonThe Ubuntu software updater tool is found in the desktop menu / Administration / Software Updater, which should be run to get the last month of updates since Ubuntu 20.10 was released. Then reboot.
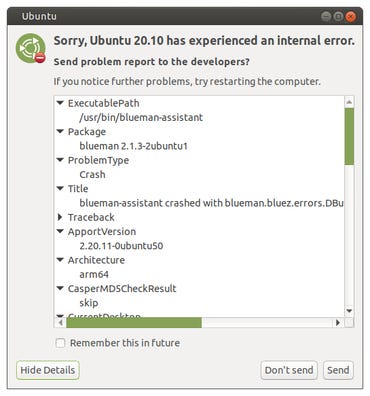 Image: J.A. Watson
Following the sequence that I used above for standard Ubuntu, the next step was to connect the Bluetooth keyboard and mouse. Unfortunately, this didn't work. The mouse paired OK, but the keyboard wouldn't pair, and never even got to the section where it should give a code to be typed into the keyboard for confirmation of the device. Sigh. Perhaps Ubuntu MATE is using a different Bluetooth stack that the standard Ubuntu distribution... but that shouldn't be.
Anyway, pressing on, I started up Firefox, that seemed OK. Start time and performance seemed about the same, certainly acceptable for everyday use.
I shut down, connected the second display, and booted back up again. The system came back up with both displays configured into an extended desktop, just as before.
I started the system monitor on the second monitor, and immediately noticed the one major difference between standard Ubuntu desktop and Ubuntu MATE – when running idle, Ubuntu MATE uses about 700MB of memory, compared to the standard Ubuntu desktop using about 1.2GB. That's a significant difference, and it could be the difference between being about to use Ubuntu on a 2GB RPi 4 or not.
 Image: J.A. Watson
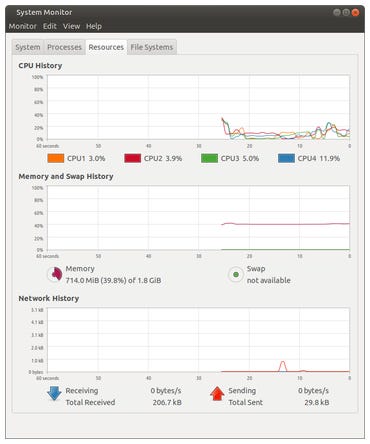 Image: J.A. Watson
Of course, I had to try it to see for myself... so I shut down, moved the SD card to a 2GB RPi 4, and booted up. As can be seen at the right, the result is very promising. When running idle Ubuntu MATE only uses 700MB of memory, that should leave enough available from 2GB to allow at least moderate everyday use.
Well, I think that's enough for a first look. My final opinion is that either of these distributions is easy enough to install, and runs well enough on a Raspberry Pi 4 for everyday use. If you really need/want to use a 2GB model, I would strongly recommend the MATE version; for 4GB or 8GB I would say just choose the desktop you like better. If you still only have a 1GB model, then you should simply stay with Raspberry Pi OS, because you would never be happy with the performance of Ubuntu in that small amount of memory.
.png)
 4 years ago
169


 Bengali (Bangladesh) ·
  English (United States) ·