BOOK THIS SPACE FOR AD
ARTICLE ADAs I've said before, the Raspberry Pi 4 runs relatively hot thanks to its greater power than previous models, and while there have been several changes made to the Raspberry Pi OS and firmware that lessened this problem, the basic design of the Raspberry Pi 4 case has also been a part of the problem, because there is just not enough ventilation and air flow to cool the CPU.
This has led to a number of third-party cases, fans and heat sinks, and now the Raspberry Pi Foundation have released their own fan specifically designed to clip into the lid of the official case.

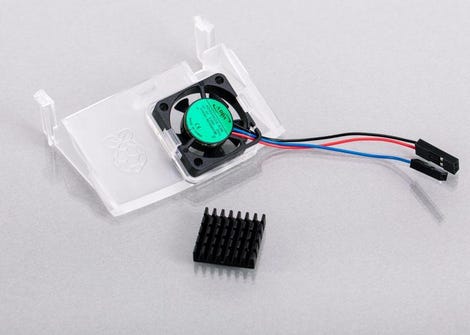
Raspberry Pi 4 Case Fan and heat sink.
Image: Raspberry Pi FoundationThe kit also includes a heat sink, but my tests so far indicate that this would only be necessary if the Raspberry Pi 4 were running under a very heavy continuous load, or if you chose to overclock the CPU. For routine use as a desktop system, web browsing and such, the fan on its own is more than enough.
SEE: Hiring Kit: Python developer (TechRepublic Premium)
The price of the kit is very low, too – it is given as $5 in the release announcement, and I paid CHF 5.90 for it at the Pi-Shop.ch. For comparison, the SHIM fan and Pico Fan kit each sell for about CHF 16.-.
 Image: Raspberry Pi Foundation
Installing the fan is quite easy. There are slots on the inside of the lid below the locking tabs, and the fan simply clips into those. There are no screws or other hardware, and you basically can't get it wrong. The lid with the fan installed should look like the image on the right.
There is a diagram on the box that shows that the red and black power wires connect to GPIO pins 4 and 6, and the blue wire (which is the control line) connects to pin 8. That last bit is actually a little misleading, because you can connect the blue wire to just about any free GPIO pin, and you than tell the operating system what pin it is on in the Pi Configuration utility. For some reason the default for this in the configuration utility is pin 14, so that is where I put it on mine.
While I'm on the subject of the Raspberry Pi Configuration utility, it is important that you have the latest Raspberry Pi OS updates installed, or that you built your microSD card from the latest distribution image (dated 2020-12-02), because the control options for the case fan have just been added there.
 Image: J.A. Watson
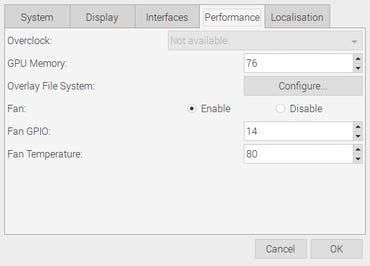
Once you have the fan installed and connected, and the latest software installed, you can then boot up the Raspberry Pi 4 and go to the desktop menu / Preferences / Raspberry Pi Configuration / Performance to get the window shown here. If the original Pi Fan is not installed (or not properly connected), the fan options will be grayed-out and not available; if it is detected, you can enable or disable the fan, define the GPIO pin where the fan control line is connected, and choose the temperature at which the fan should come on, in the range of 60-120 degrees.
As a final touch, if you are really concerned about CPU temperature, you can add the CPU Temperature Monitor plugin to the top panel. Right-click on the panel, choose Add/Remove Panel Items from the drop-down menu, and then click Add and select CPU Temperature Monitor.
If you're interested in either the practical issues involved in designing this fan, or the physics of the airflow within the case for cooling the CPU, you should take a look at Gordon Hollingworth's Designing the Raspberry Pi Case Fan post in the Pi Blog. There's lots of discussion of practical issues, such as adding holes to the case to increase air flow, and the much more technical information showing CFD (computational fluid dynamics) analysis of the airflow within the case.
What that analysis showed was that the problem could not be solved by simply making a bunch of holes in the case to get more air in, it's getting that air moving cleanly across the CPU and then out of the case. (I had figured that out myself, by drilling a bunch of holes in the top, sides and bottom of the case and only getting a very small improvement in cooling for my trouble).
The very clever solution that came from all of this analysis is that the fan mounting bracket actually forms a sort of a divider, with the fan sitting at an angle toward the CPU. The air is drawn in around the USB and RJ-45 ports, directed by the fan across the CPU, and than passes out around the microSD card slot.
SEE: Hands-On: Adventures with Ubuntu Linux on the Raspberry Pi 4
I ran a few simple tests to compare the official fan to a fan SHIM which I already had around here. The results were nearly identical in reducing the CPU temperature while running streaming audio/video, or making very large compilations or computations, or extensive and prolonged disk access.
Physically the SHIM is probably a bit easier to install and perhaps a bit more versatile because it can be used in any situation where there is enough clearance for it, whereas the official fan will only work with the official case. Functionally the official fan has a small advantage, because the controls for it are included in the latest Raspberry Pi OS and the utility is part of the standard Pi Configuration tool, while the SHIM software has to be separately installed and run. But the SHIM fan also has an LED that can be used to indicate the fan status, and a tiny button that can be used to control the fan manually.
So overall I would say that for those who just want to use the Raspberry Pi 4 in the official case, the official fan is a good solution at a good price. Those who might be a bit more inclined to tinkering, using different cases and different installations, and having easy access to the software, might find the Pi fan a bit limiting.
.png)
 4 years ago
147


 Bengali (Bangladesh) ·
  English (United States) ·