BOOK THIS SPACE FOR AD
ARTICLE ADThe Argon One M.2 case for the Raspberry Pi 4 caught my eye because it offers creative solutions for a number of different issues in a single package. For example:
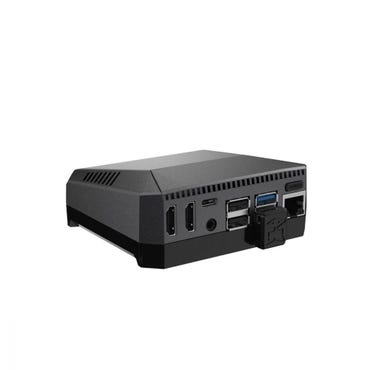
CPU Cooling: This is a well-known problem with the Pi 4. The Argon One case has both active and passive cooling. For active, it includes a programmable fan; for passive, the case is (mostly) metallic, and has posts and silicon thermal pads to transfer the heat to the case for dissipation.Cable connections: Whether or not this is a problem depends on the specific installation and use, but when it is a problem it can be a big one. The Raspberry Pi 4 Model B has connections on two sides, which can lead to a messy installation on a desktop, or an even worse problem in tight-space installations. The Argon One case includes an extension board that shifts all of the connections to the back of the case.Connection types: The Raspberry Pi 4 has two micro-HDMI connections (due to space limitations on the side of the board). It is the first Pi model to use this cable type, and a lot of users are not happy about having to get new/different HDMI cables, or micro-to-full HDMI adapters. As part of moving the HDMI connections from the side to the back, the Argon One expansion board changes them to full-size HDMI ports.Power button: Some users are still unhappy about the Raspberry Pi not having a power button to ensure an orderly and safe shutdown. The Argon One case includes a power button that gives reboot, shutdown, and immediate power-off actions.M.2 SSD drive option: An add-on board provides a socket for an M.2 SSD drive, with key-B or key-B&M connection, and a jumper plug that then connects the SSD drive to a USB 3 port.
I have some experience with the Element14 Pi-Desktop case for the Raspberry Pi 3 (and 2), which has many of these same features. So when I saw the Argon One M.2 case, I knew it would be worth a try.

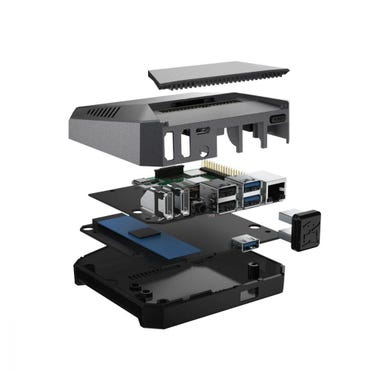
Exploded view of the Argon One M.2 Case.
Image: Argon Forty TechnologiesThe picture at the right shows an exploded view of the Argon One M.2 case. Going from top to bottom:
A metallic top section with a magnetically attached cover over the GPIO pins. The pin numbers and names are given on the case.A Raspberry Pi 4 Model B board, with the Argon One HDMI-Audio extension board attached.The Argon One M.2 expansion board, which has a connection for an M.2 key-B or key-B&M SSD, with mounting holes for 22, 46, 60 and 80mm lengths.The USB jumper plug, which connects the M.2 expansion board to a USB 3 port (external).The bottom cover, which is plastic to allow better WiFi quality.
Installing the Raspberry Pi 4 in the case is relatively easy. The case comes with a 6-page booklet with assembly instructions and illustrations. The only part that I found at all tricky or confusing was that the silicon thermal pads should be stuck on the ends of the two posts extending down from the top cover; they will then be pressed against the chips on the Pi 4 board when it is mounted in the cover.
The GPIO pins of the Pi 4 have to be aligned with the socket on the Argon power/fan board, which is pre-installed inside the cover – but this isn't too difficult, because the board will only seat properly in the cover when the pins are aligned properly.
There is one more decision that you have to make about the power configuration. Because the Raspberry Pi 4 doesn't have a power switch or other power controls, when you plug it in it will immediately power-on and boot up. The Argon One case adds a power button, and it actually gives you a choice about this. In the default factory configuration, it does not power up when power is connected to the case, you have to press the power button to start up. If you want it to boot automatically when power is applied, you have to move a jumper which is located on the power/fan board inside the top cover. The setting of the jumper does not affect how the power button works for shutdown or reboot.
If you are planning to use an SSD, it has to be mounted on the M.2 expansion board, which is pre-installed inside the bottom cover. The documentation says that it will take M.2 boards with either key-B or key-B&M connections, but in my searches of vendors here in Switzerland I didn't find any SSD boards with key-B, so B&M was the only possibility.
The mounting screw is initially in the location for an 80mm unit (which means a 2280 device). If you want to use a smaller board (I am using a 2242 device), you have to move the mount to the appropriate location before installing the board.
 Image: Argon Forty Technologies
After you put on the bottom cover, if you are using an SSD in the case, then you have to add the external USB plug to connect the M.2 expansion board in the base to the USB 3 plug on the Pi 4. If you don't have an SSD drive, then you don't need to bother with the USB plug. It is also worth keeping in mind that if you are using an SSD, but you want to disconnect it at any time you can simply remove the USB plug.
Once you have the Pi 4 assembled in the case and you connect the power supply, you might be surprised if it doesn't boot (I was). If you didn't change the power jumper, it won't power-on and boot until you press the power button. So don't assume that something is wrong (not saying that I did that...), just push the power button for a second or so, and it should power-up and boot.
Speaking of the power button, when the Raspberry Pi 4 is running you can make an orderly shutdown and power off by pressing the power button for three to five seconds. If you want to reboot a running system, double-click the power button. If the Raspberry Pi is hung or otherwise non-responsive, holding the power button for more than five seconds will force an immediate power-off. All very handy.
 Image: J.A. Watson
The last thing I am going to look at here is perhaps the most interesting element (at least to me), the M.2 SSD. If there is an M.2 drive installed, and the USB jumper is in place, the disk should show up on the desktop (assuming it has a disk label and partition table).
 Image: J.A. Watson

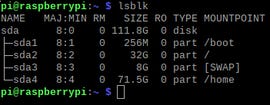
You can also check for its presence from the command line using the lsblk command as shown at the right. In this example you can see that the microSD card is known as /dev/mmcblk0, and it has two partitions (for /boot and /), and the M.2 disk is known as /dev/sda and has one partition.
SEE: Hiring Kit: Computer Hardware Engineer (TechRepublic Premium)
If you simply want to use that SSD drive as a work disk of some sort, you can add a line for it to /etc/fstab so that it is automatically mounted on boot, or you can manually mount it when you need it.
However, if you want to boot from it, rather than from a microSD card, you can prepare it as I described in detail in my previous post about USB Booting the Raspberry Pi 4. I chose to use the SD Card Copier utility, which resulted in the M.2 SSD having two partitions, which can then be seen when lsblk is run again.
 Image: J.A. Watson

If the destination drive (the M.2 SSD in this case) is larger than the source drive (the microSD card), the SD Copier Utility will expand the last filesystem to fill the available space on the disk. This makes for a very large root filesystem in this case. Because of the way that I use my Raspberry Pi systems, and because I am an old Unix geezer, I don't want such trivial disk partitioning, so I then used gparted to shrink the root filesystem to a reasonable size and create a new filesystem which I added to /etc/fstab to be mounted as /home. I also don't like swapping to an ordinary file in the root filesystem, so I also make a swap partition on the SSD.
In summary, I would say that I think the Argon One M.2 case is very good. If you are going to use a Raspberry Pi 4 as a desktop system, and you want a case that looks professional and solves the Raspberry Pi cooling problem, this one would be a good choice. In my opinion it has two significant drawbacks:
Price: It is listed at $45 on the Argon One web page; I got mine for CHF 55.- at the pi-shop.ch. That's pretty expensive, especially compared to CHF 15.- for the original Pi 4 case and cooling fan.RTC: At this price, it really should include a realtime clock chip and battery, like the Element14 Pi-Desktop..png)
 4 years ago
221


 Bengali (Bangladesh) ·
  English (United States) ·